2. Tests
Build a test, publish it, invite candidates, and follow the results.
On this page:
- The list of tests
- Drafts
- Making a new test
- A test in a minute (quick start)
- A test from a job description
- Recording a spoken answer in an Explain step
- Steps on a real-work task
- Sections, settings and monitoring
- More test options
- The test page
- Inviting a candidate
- Helping a candidate: adjustments and extra time
- Task catalogue: ready-made tasks
- Review an AI-written pull request
- Letting candidates use documents, and assistant answers that are wrong on purpose
The list of tests
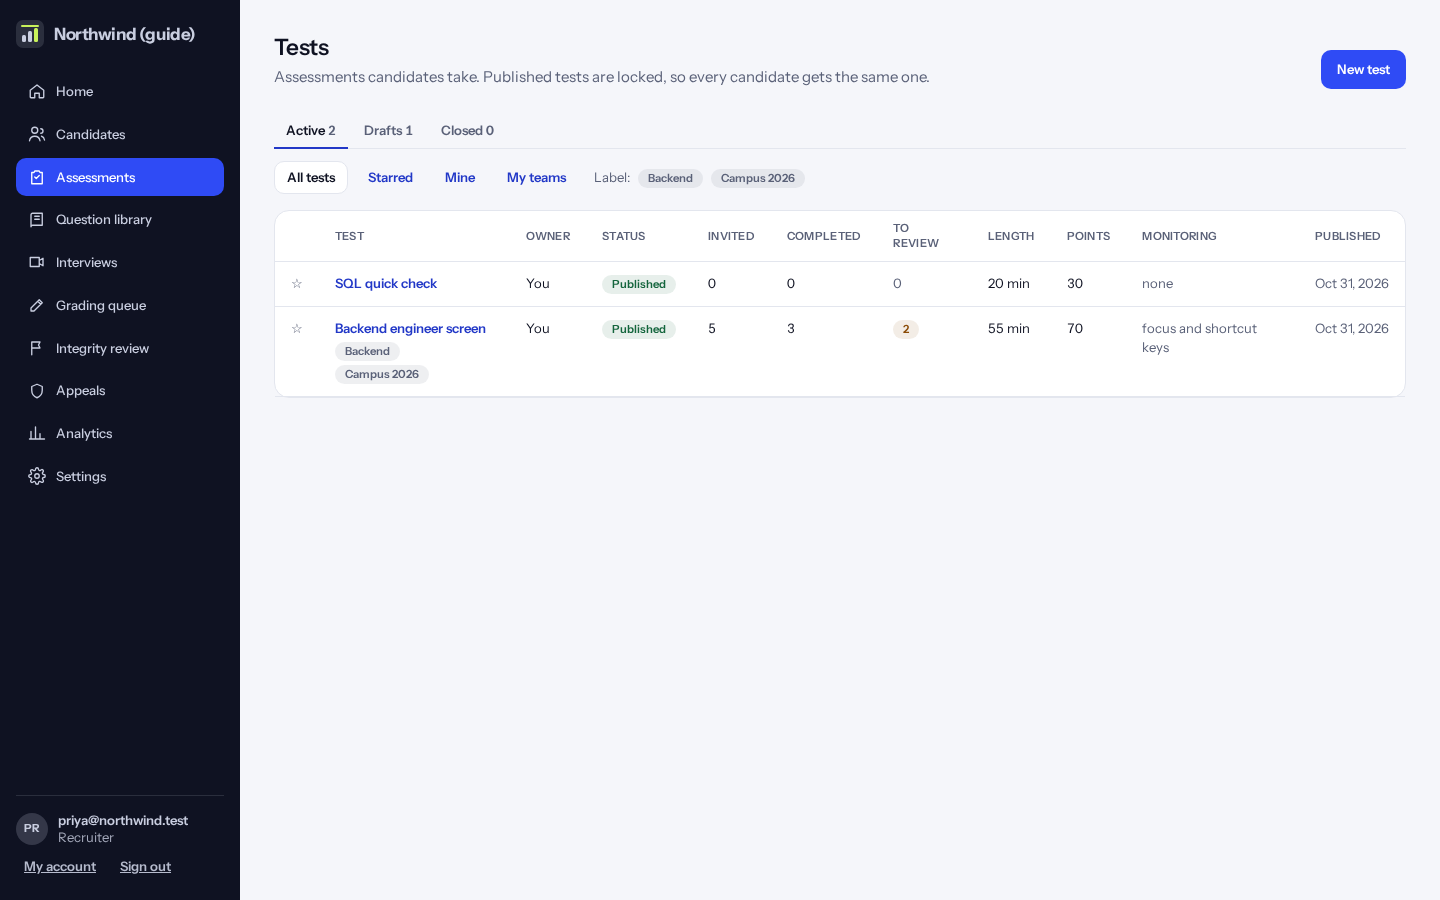
Click “Assessments” in the left menu. Tests are split into three tabs: Active (published), Drafts and Closed.
For each test you see how many candidates were invited, how many finished, and how many answers wait for a person to mark.
Tip: Use “Starred”, “Mine”, “My teams” and the labels to find tests quickly. Click the star next to a test to keep it at hand.
Drafts
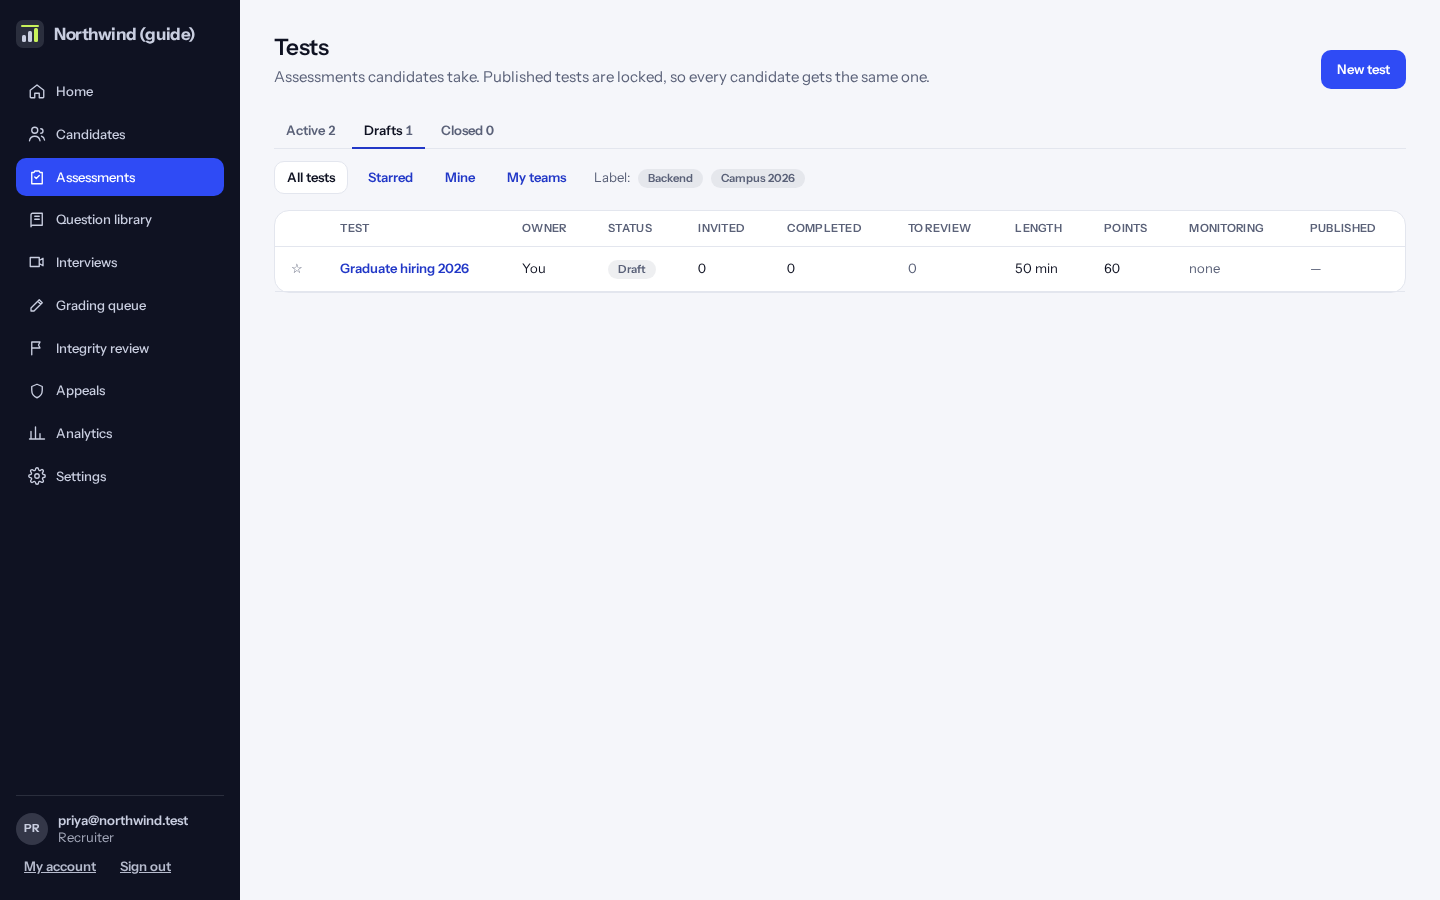
A draft can still change. Publishing locks it, so every candidate gets exactly the same test.
Making a new test
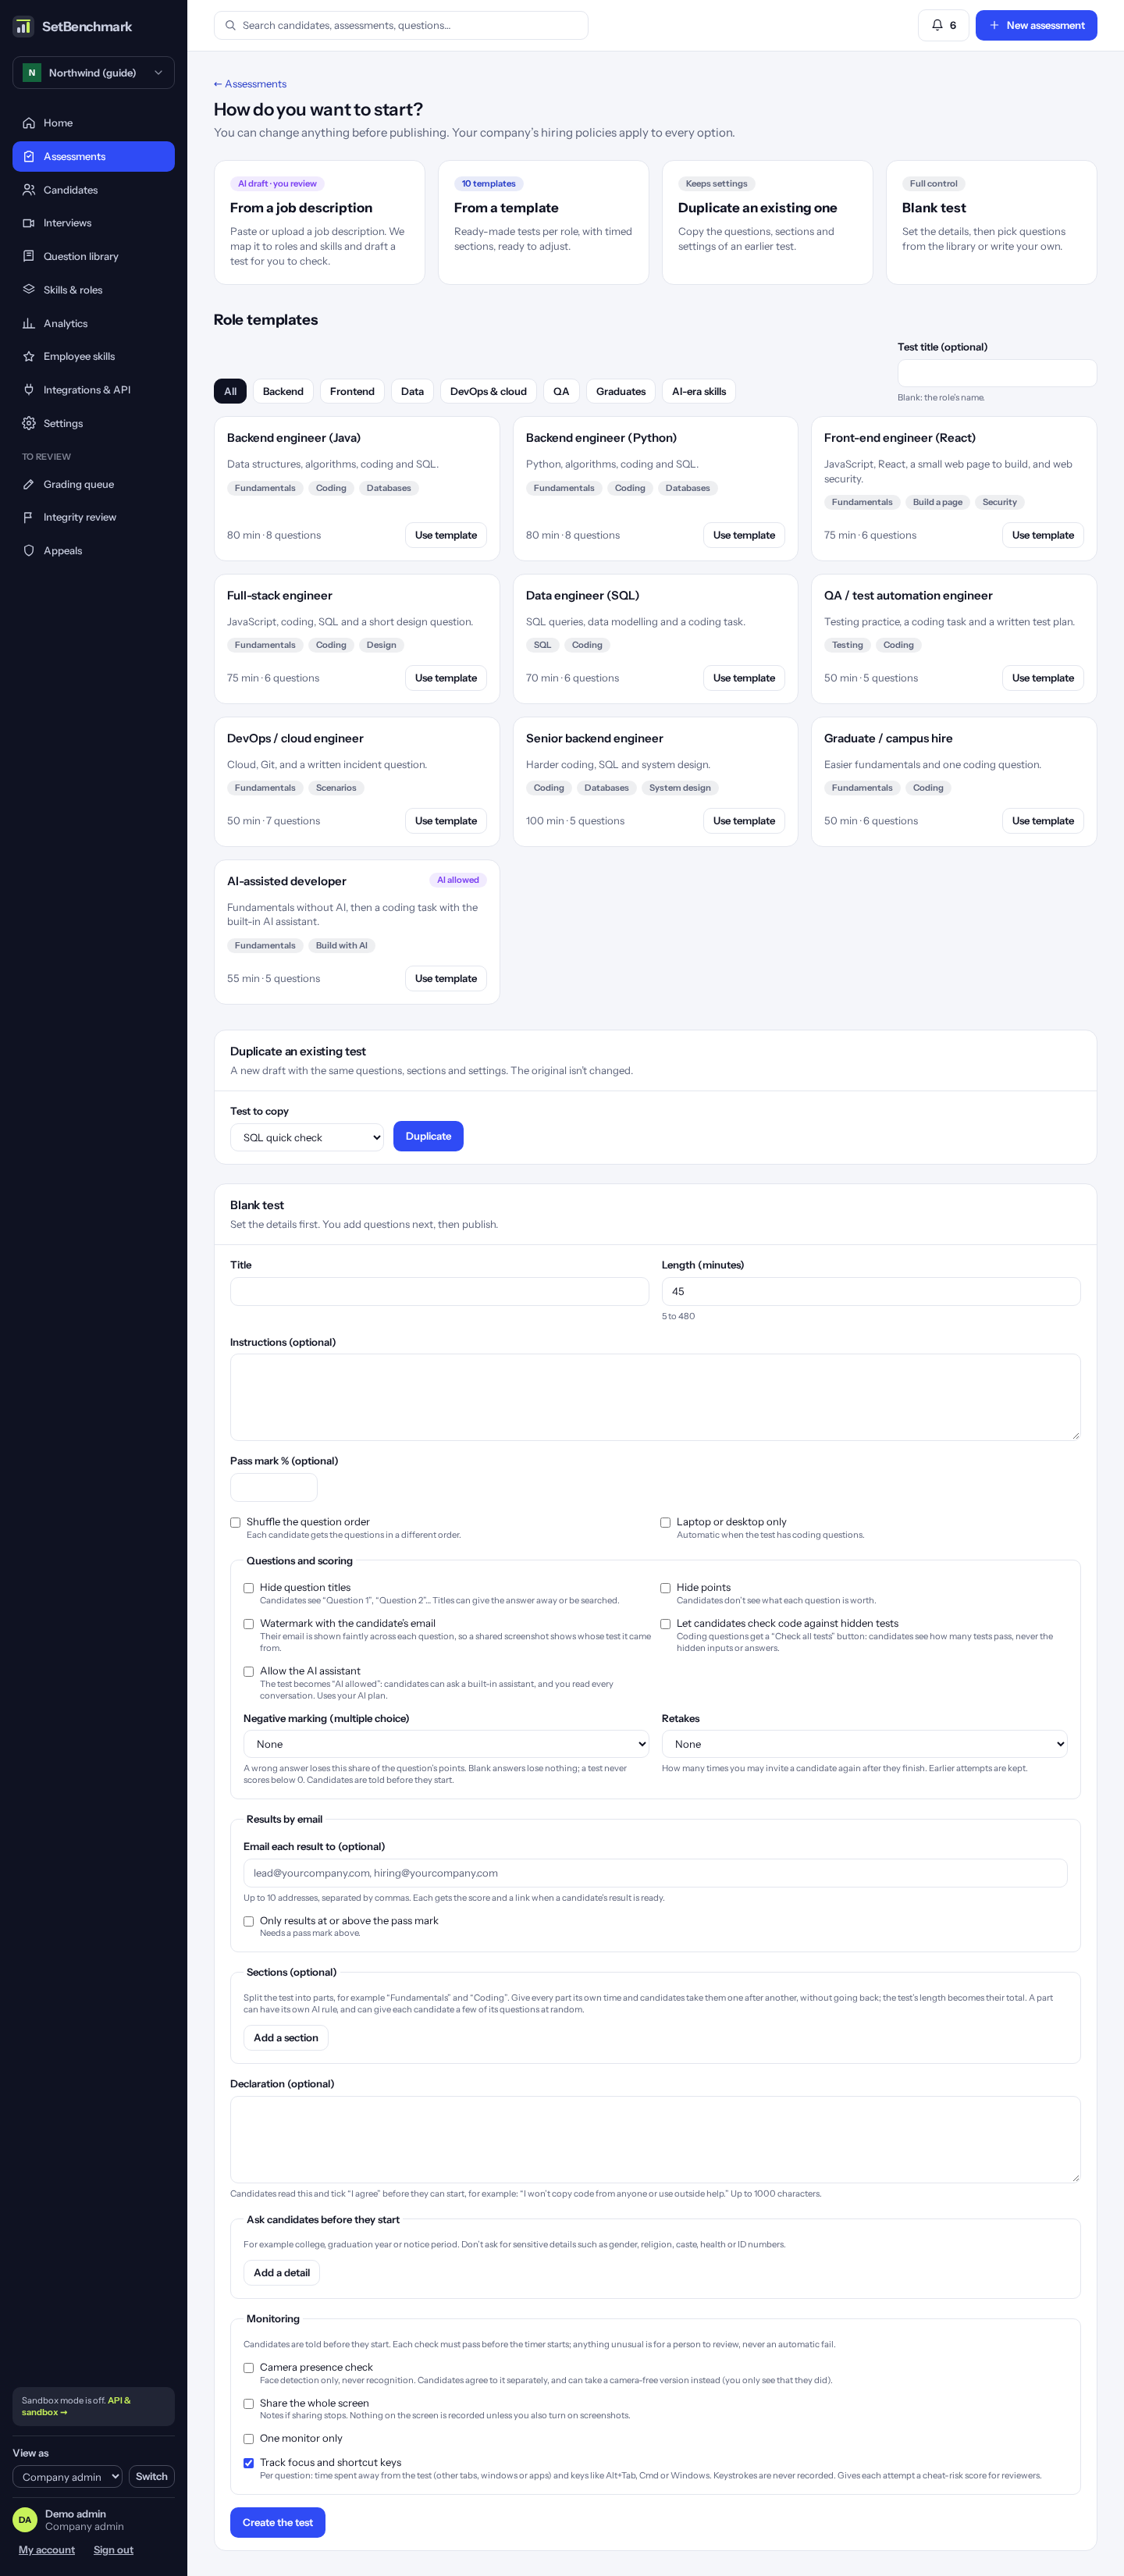
Click “+ New assessment” in the top bar, or “New test” on the Assessments page. The page asks “How do you want to start?” and offers five ways:
1. A test in a minute: paste a job description, look over the test the AI makes, publish it and share one link (only if your plan includes AI; see “A test in a minute” below).
2. From a job description: paste or upload the job advert and the AI suggests a test for you to check (only if your plan includes AI; see the next part).
3. From a template: ready-made tests per role, such as “Backend engineer (Java)”, with timed sections filled with suitable questions from the library. Use the category buttons to narrow the list.
4. Duplicate an existing one: a new draft with the same questions, sections and settings as an earlier test. The original is not changed.
5. Blank test: give it a title and length, then add questions yourself.
How to do it:
- Click “+ New assessment”.
- Pick a way to start. For a template click “Use template”; to copy, choose the test and click “Duplicate”; for a blank test fill in the form and click “Create the test”.
- The new draft opens. Check the questions before publishing.
Tip: If the template could not fill a section from your library, the draft tells you what is missing.
Tip: Your company’s hiring policies apply to every way of starting.
A test in a minute (quick start)
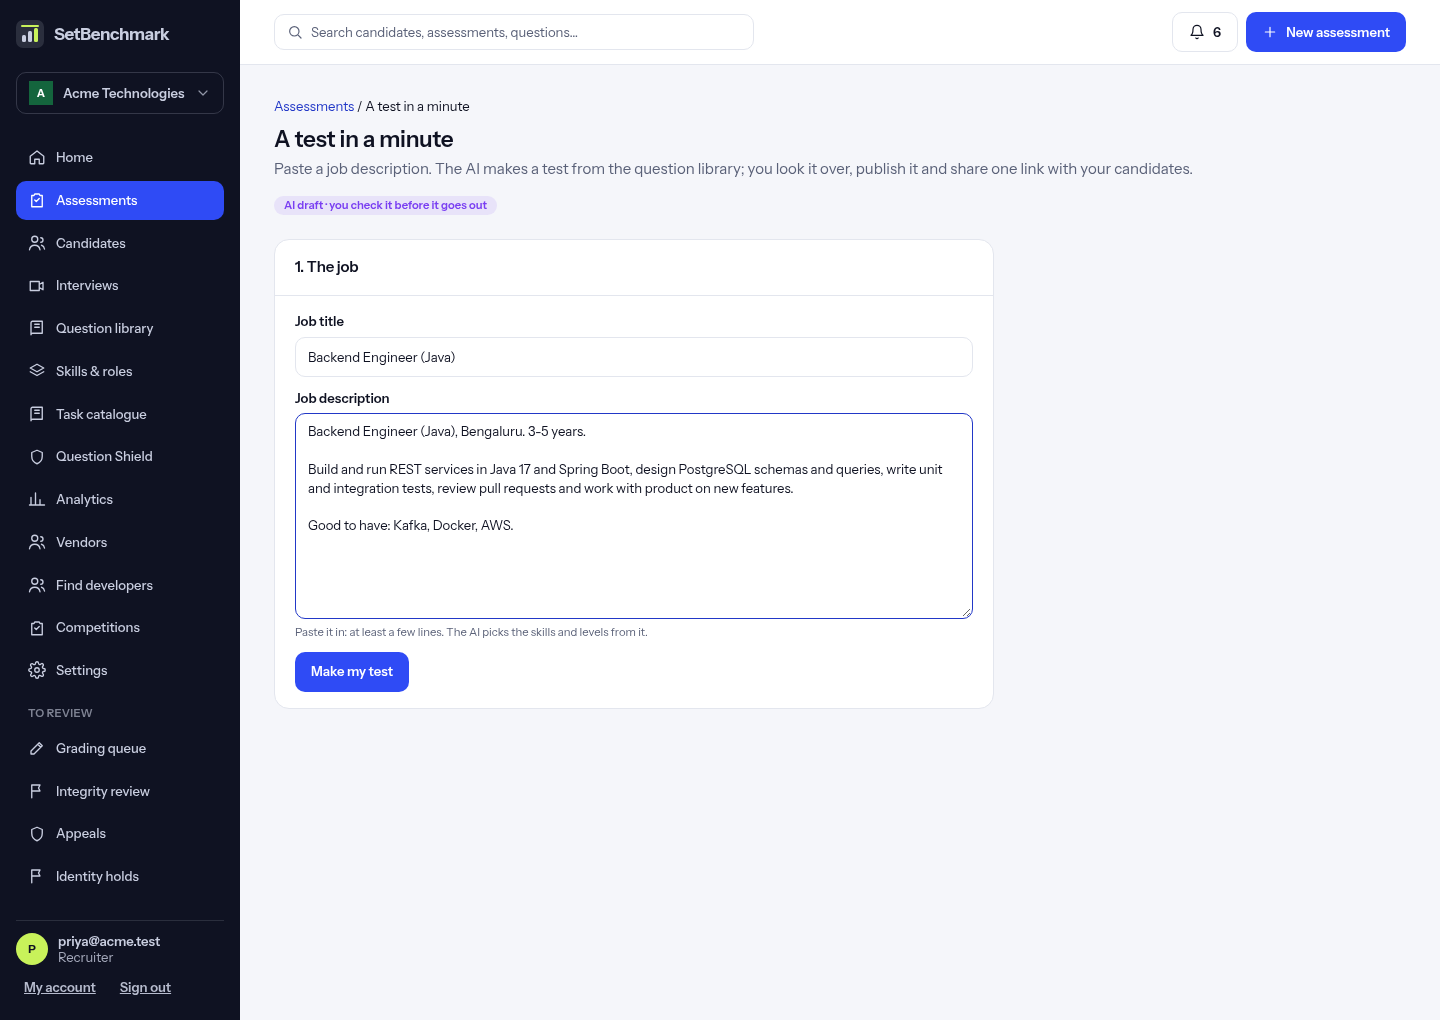
The quickest way to get going. Click “A test in a minute” on Home (under Quick start) or on the “How do you want to start?” page. Everything happens on one screen.
Type the job title and paste the job description, then click “Make my test”. The AI picks the skills and levels and fills a test from the published questions in your library. This takes about 20 seconds.
You then see the test: its title, length and every question. Skills the library had no question for are listed. Nothing has gone out yet: click “Change it first” to open it in the builder, or “Publish and get the link”.
Publishing makes a link anyone can use to take the test: copy it into an email or your job post. Candidates give their name and email first. Open the test afterwards to add a password or closing date to the link, invite people by email instead, or see who has taken it.
How to do it:
- Click “A test in a minute”.
- Type the job title and paste the job description. Click “Make my test”.
- Look over the questions. Click “Publish and get the link”.
- Click “Copy link” and send it to your candidates.
Tip: If your library has nothing for the job’s skills, the screen says so and doesn’t publish an empty test: write or import questions first.
Tip: For more control (swapping questions, choosing sections), use “From a job description” instead.
A test from a job description
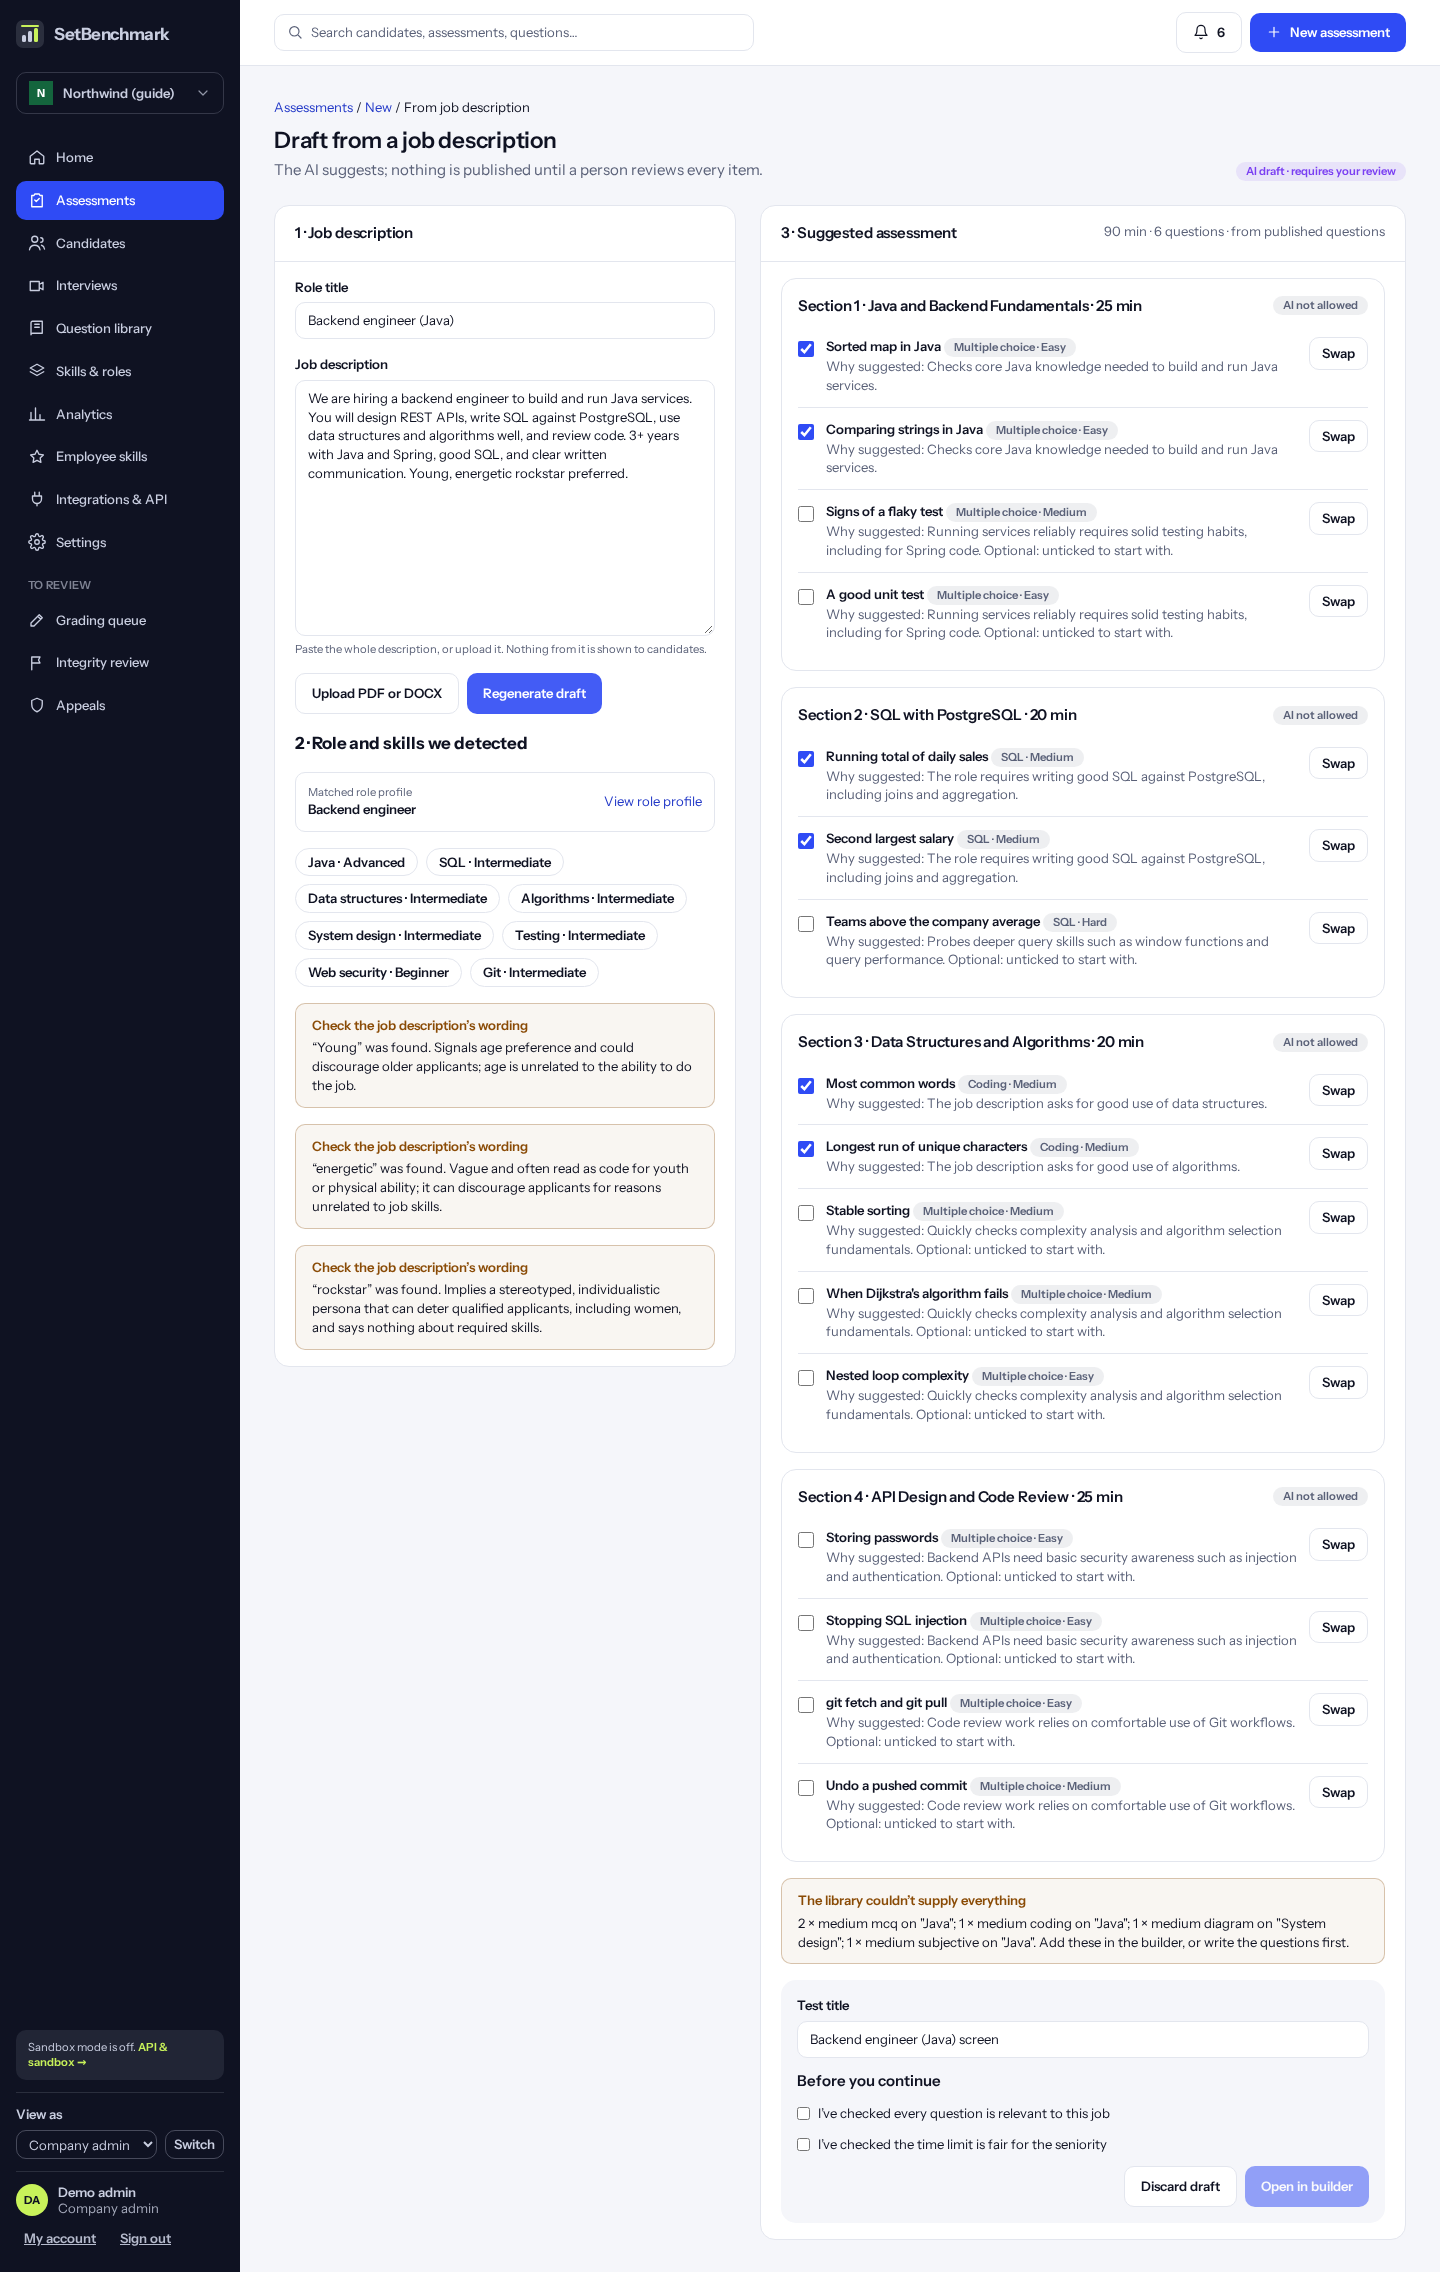
Choose “From a job description”. Type the role title, then paste the job description or click “Upload PDF or DOCX” (a PDF, Word or text file up to 5 MB). Check the text, then click “Suggest a test”. This can take a minute.
You then see the role and skills the AI found, with the level for each, and the closest role profile. Skills shown with a dashed border are not in your skills list yet. If the job description uses wording that could put applicants off for reasons unrelated to the job, a yellow note says so.
On the right is the suggested test, in sections with minutes and whether AI help is allowed. Each question says why it was suggested. Untick questions you don’t want, or click “Swap” to get another published question on the same skill. Optional questions start unticked.
Tick the two checks (the questions fit the role, and the time is fair), give the test a title and click “Open in builder”. Nothing is saved until then, and nothing is published: it opens as a draft.
Tip: The AI only picks questions already published in your library. What it couldn’t fill is listed, so you can write those questions.
Tip: Reading a PDF uses the AI and counts in your AI usage; Word and text files don’t.
Recording a spoken answer in an Explain step
In an Explain step, if a speech service is switched on, candidates can record their written answer for up to 3 minutes. Their words appear in the answer box for them to check, and a person marks it like any written answer. The recording isn’t kept.
Steps on a real-work task
On a test with sections, each section can be marked as a step: Debug, Build, Optimise or Explain. Choose it under “Step” when you edit the sections. The test page then shows which step each section is.
Sections, settings and monitoring
A test can be split into sections, for example “Fundamentals”, “Coding” and “Design”. Each section can have its own time; candidates then do the sections one after another and can’t go back.
A section can also have its own AI rule (AI allowed or not), and can give each candidate only some of its questions, picked at random. This makes answers harder to share.
Under “Questions and scoring” you can hide question titles and points from candidates, take points off for wrong multiple-choice answers (negative marking), allow retakes, let candidates use the built-in AI assistant, and ask for details before they start (for example their notice period).
Under “Monitoring” you choose what is checked during the test: focus and shortcut keys, the camera, screen sharing, one screen only. With the camera check you can also keep one photo of the candidate as the test starts, shown to the reviewer; it is never compared with other photos. To check who the candidate is, tick “Identity check” instead: an ID and a live selfie before the test, and face matching during it (see “Identity check: ID, live selfie and voice”). Candidates are told before they start and must agree.
Tip: Candidates who agree to adjustments (for example extra time) get that time in every section.
More test options
Under “Moving between sections”: with timed sections, tick “Carry unused time over” and a candidate who finishes a section early gets the time left added to the next one. Sections without their own time can still be taken in turn with no going back (“Take sections in turn”), or shuffled so each candidate gets them in a different order (“Shuffle the sections”).
“Watermark with the candidate’s email” shows their email faintly across every question, so a shared screenshot shows whose test it came from.
“Let candidates check code against hidden tests” adds a “Check all tests” button to coding questions: candidates see how many tests pass, never the hidden inputs or answers.
“Declaration” is your own short text, for example “I won’t copy code or use outside help”. Candidates must tick “I agree” before they can start.
Under “Results by email”, add up to 10 email addresses. Each gets the score and a link when a candidate’s result is ready. Tick “Only results at or above the pass mark” to hear only about candidates who pass.
Tip: Your company can fix some of these for every test in Settings → Hiring policies. A fixed setting is greyed out on the test.
The test page
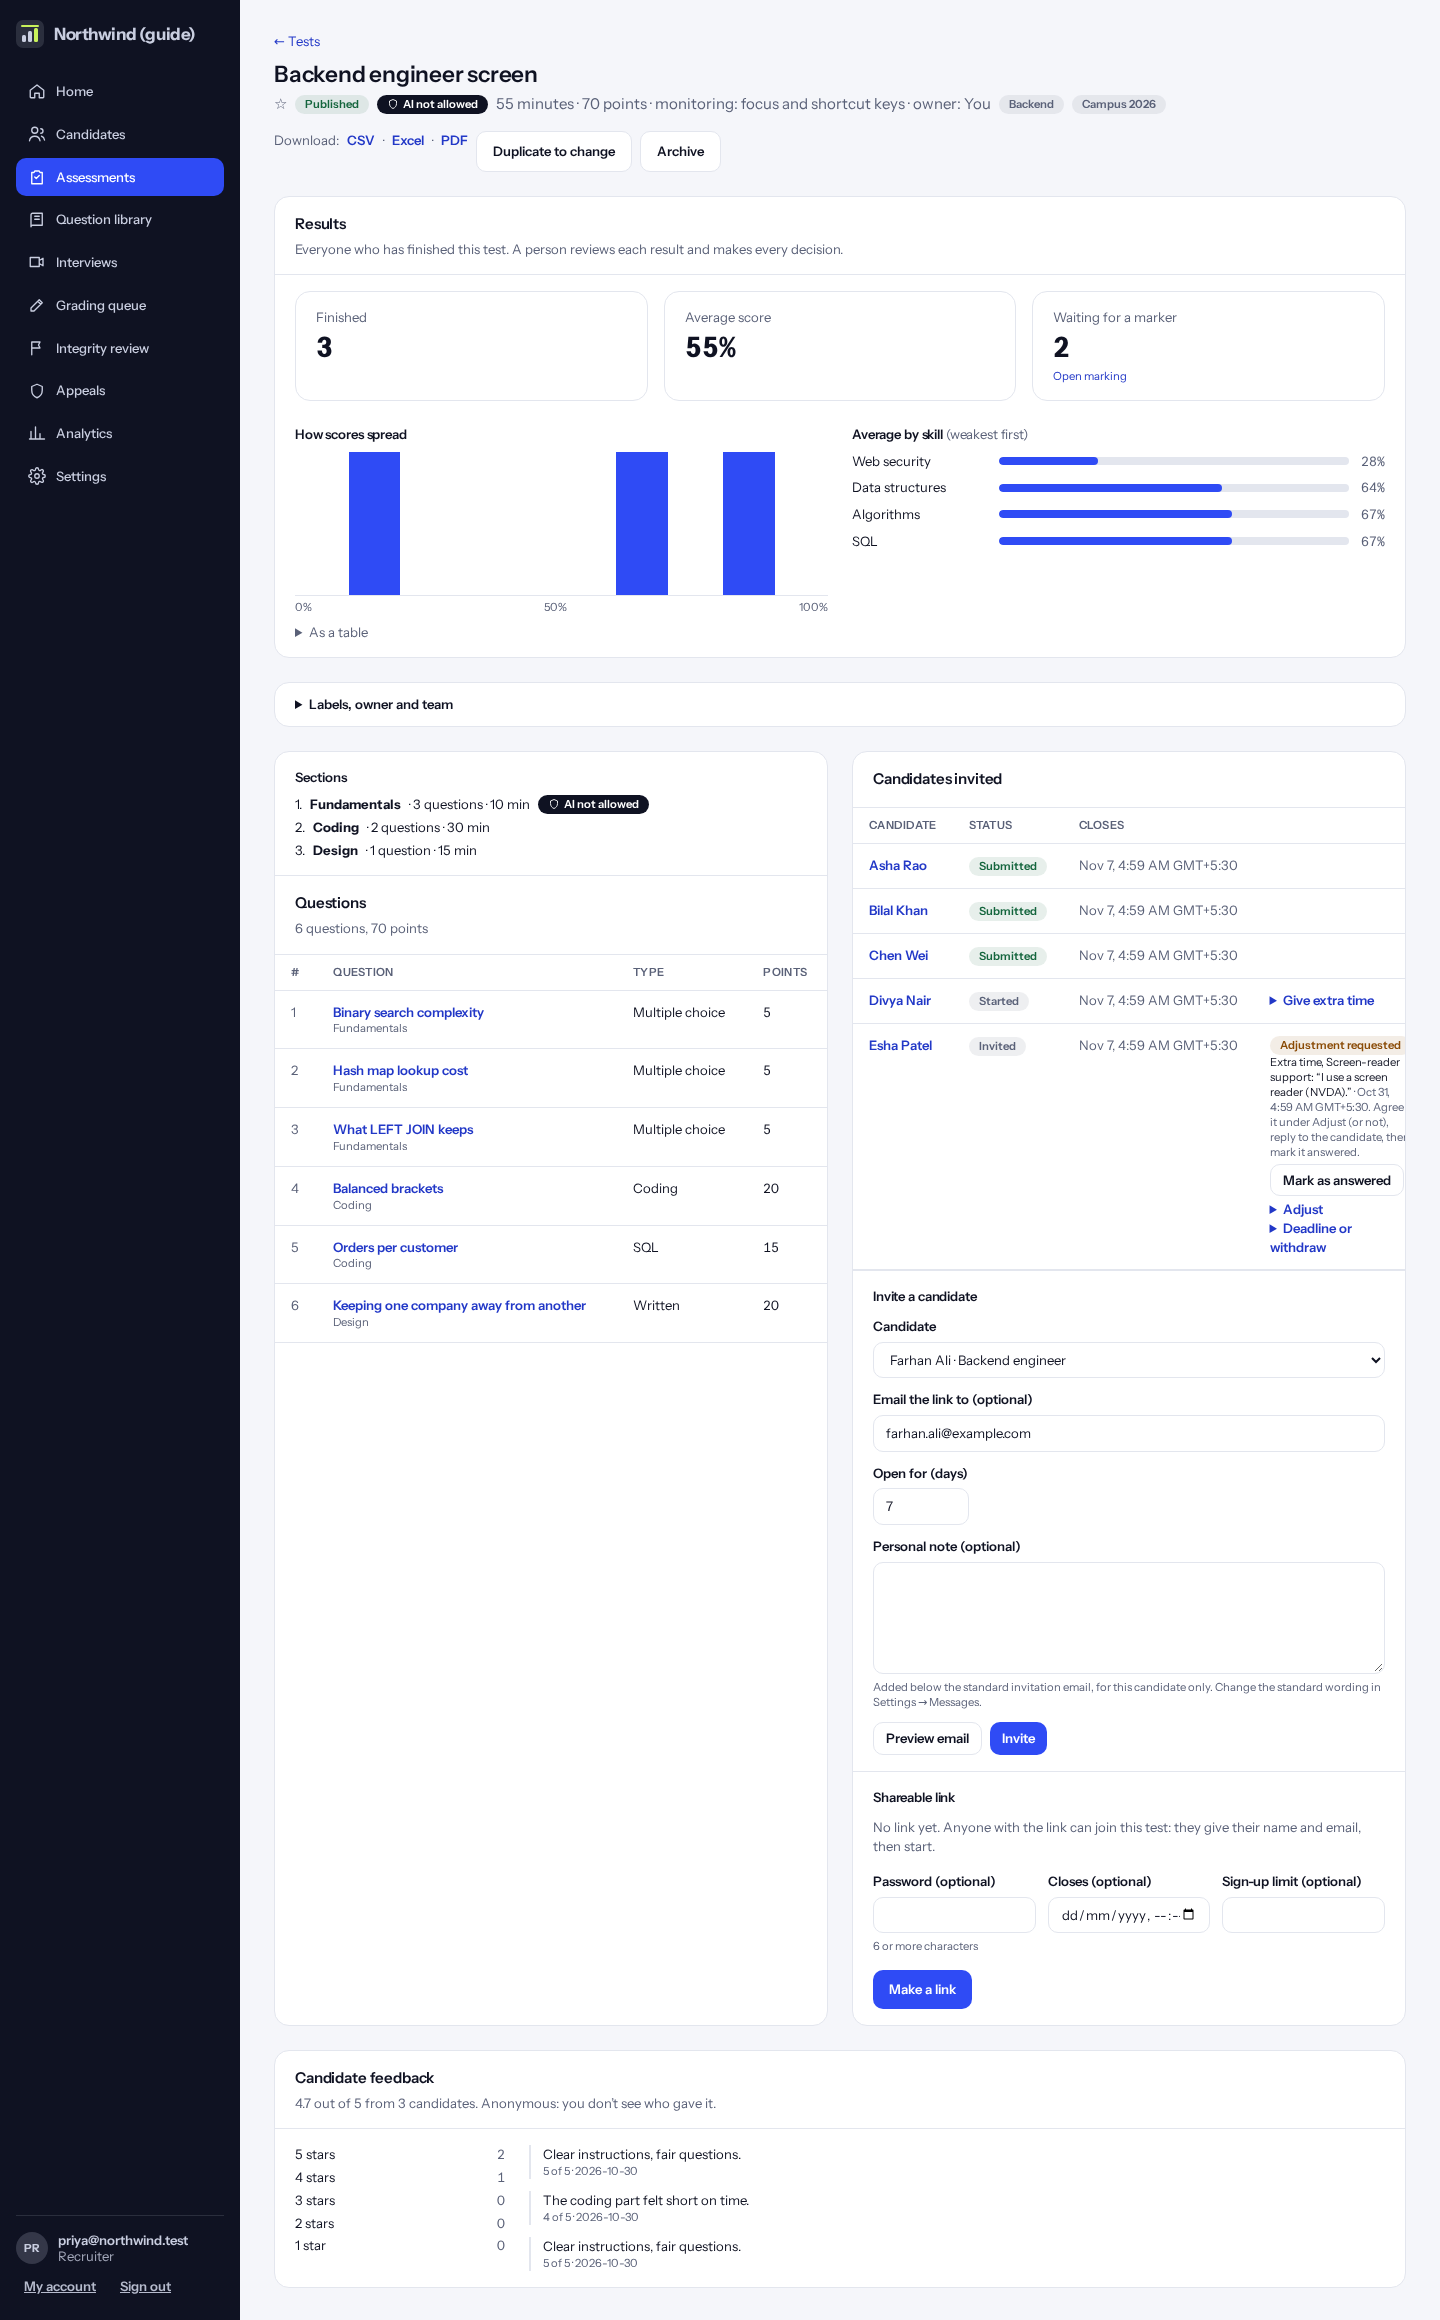
Open a test to see everything about it on one page:
• Results: how many finished, the average score, how scores spread, which skills and which questions were hardest, and how much of their time candidates used.
• Sections and questions. In a draft you can move a question up or down and change its section.
• Candidates invited, and what each is doing.
• “Invite more” at the top right: invite a candidate or a list of people, and the shareable link.
• Feedback candidates gave about the test (anonymous).
To download the results, choose CSV, Excel or PDF next to the title. “Columns” lets you pick what the download has, for example the email, the minutes each candidate used, or a score for every question. Your choice is remembered on this computer.
Inviting a candidate
How to do it:
- On the test page, click “Invite more” at the top right. Three tabs give the ways to invite: One person, A list (paste or upload up to 100 people) and Shareable link. On One person, choose the candidate; nobody is picked for you, and the form clears after each invite so a note can’t go to the next person.
- Check the email address and how many days the test stays open.
- Add a personal note if you like. Click “Preview email” to see exactly what they will get.
- Choose “Extra time” if this candidate needs more time (for example +25%). They get it in every part of the test.
- Click “Invite”. The candidate gets an email with their own link.
Tip: To invite a list of people at once, open the “A list” tab. Paste one person a line (name, email), or choose a spreadsheet saved as CSV. Up to 100 at a time; people already invited are skipped, and lines without a valid email are listed so you can fix them.
Tip: To invite many candidates without names first, use “Make a link” on the “Shareable link” tab. Anyone with the link gives their name and email, then starts. You can add a password, a closing date and a limit. You also get a button to put on your careers page.
Helping a candidate: adjustments and extra time
Candidates can ask for an adjustment before they start, such as extra time or screen-reader support. Their request shows next to their name, and on the home page.
If something goes wrong on our side during a test, click “Give extra time” next to that candidate. Write a short note; the candidate sees it on their screen and their timer goes up.
How to do it:
- Read the request next to the candidate’s name.
- Click “Adjust” to give extra time or switch off a check, if you agree.
- Reply to the candidate, then click “Mark as answered”.
Task catalogue: ready-made tasks
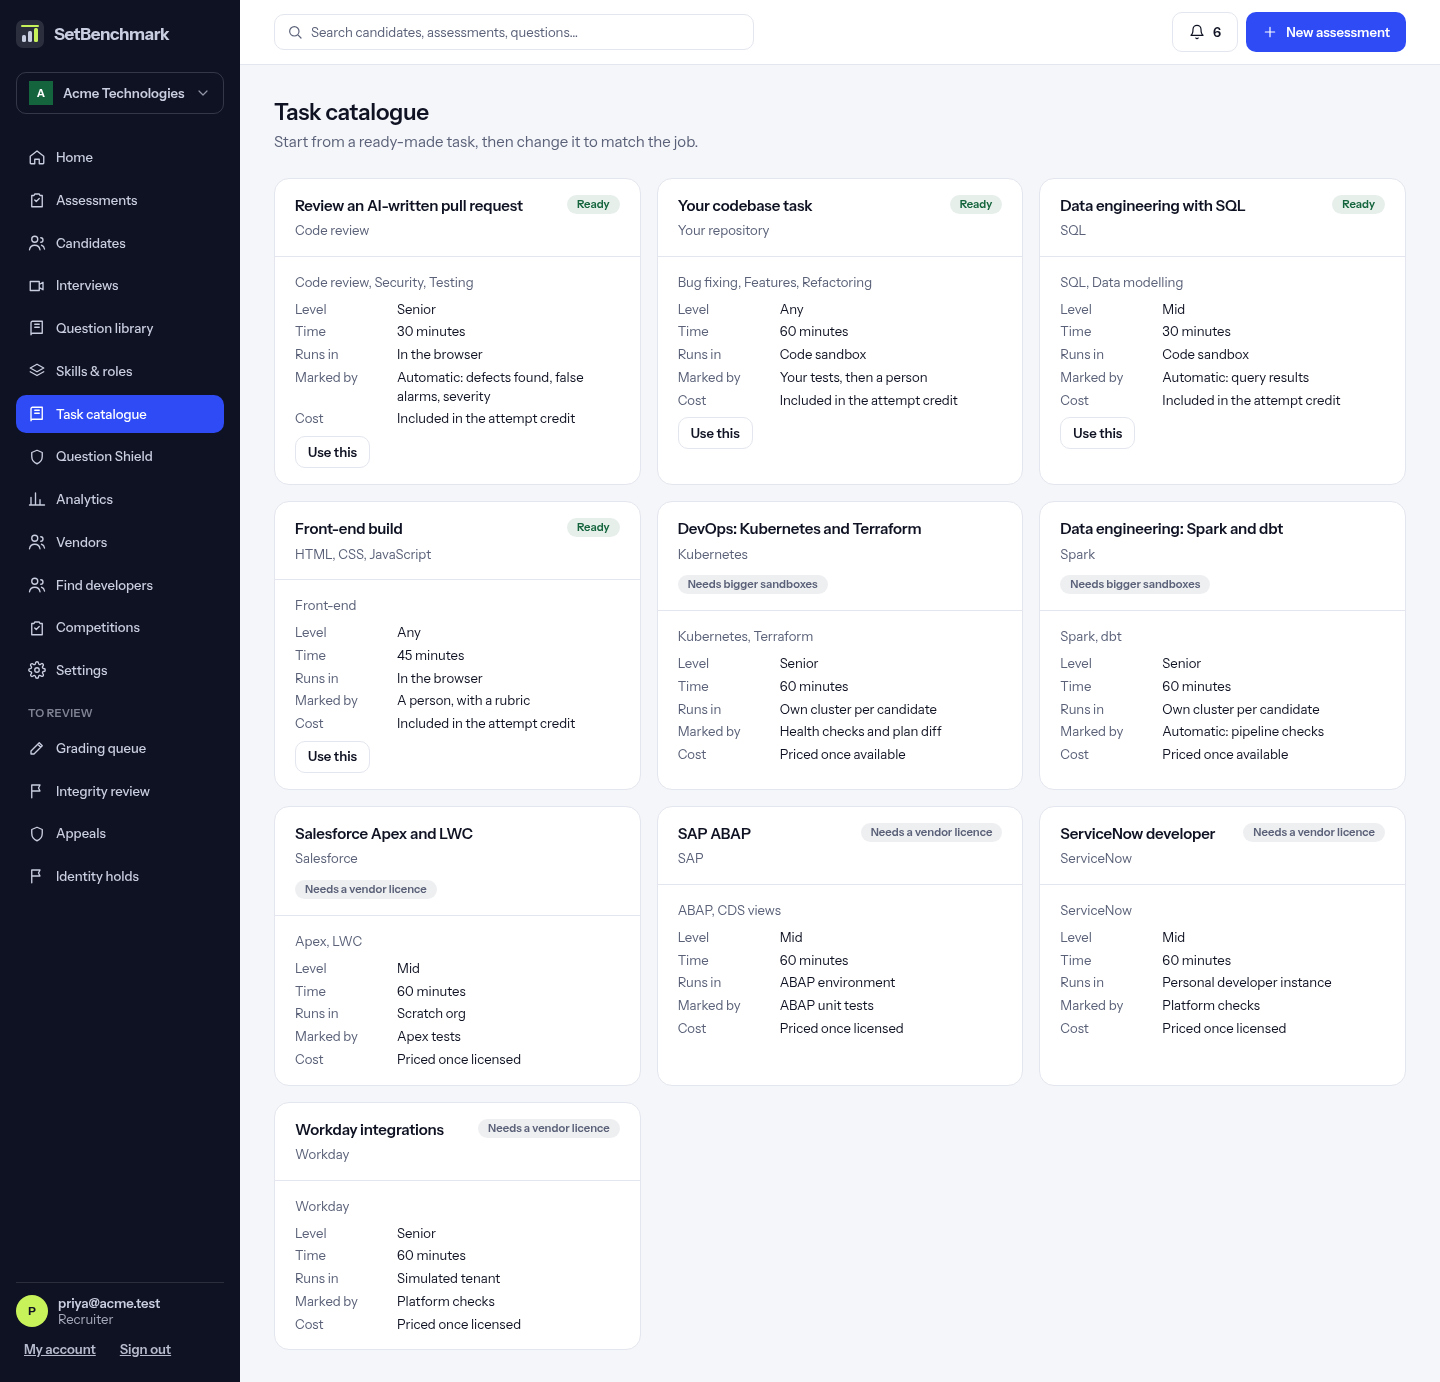
Click “Task catalogue” for ready-made kinds of task, each with its platform, skills, level, time and how it’s marked. “Use this” starts one. SAP, Salesforce, ServiceNow and Workday show “Needs a vendor licence”, and Kubernetes and Spark show “Needs bigger sandboxes”: those can’t be used yet.
Review an AI-written pull request
In “Task catalogue”, choose “Review an AI-written pull request” and click “Use this”. You get a draft question with a worked example: code with six problems planted in it. Change the code and problems to suit the job, then send it for review as usual.
Candidates comment on the lines with problems, give each a severity, and choose Approve or Request changes. They never see the planted problems. A comment within one line of a problem counts as finding it.
It’s marked automatically: half for problems found (recall), 30% for comments that were real (precision), 10% for severity and 10% for the verdict. On the candidate’s page, the row shows recall and precision; open it to see each problem found or missed and each false alarm.
To plant problems in your own code review question, use “Planted problems” in the editor, one per line: line number | security, logic, performance or tests | low, medium or high | what’s wrong.
Letting candidates use documents, and assistant answers that are wrong on purpose
In a test’s settings, “Documents candidates may use” takes one https address per line. Candidates see them as links during the test. Use sections to set steps like Debug, Build, Optimise and Explain, with points per question.
With the AI assistant on, tick “Test how carefully candidates check the assistant”. About one answer in four then has a deliberate mistake. Candidates are told before and during the test, and the conversation in your report shows which answers had one. Using the assistant is never marked down in itself.